Rows
- Former user (Deleted)
Adding Rows
Sometimes it is necessary to add new lines to an existing Refine project. A typical example of this when a single row in a publisher provided title list turns out to represent coverage across several titles changes - for example:
The list of journal titles from Project Muse, available from http://muse.jhu.edu/holdings contains one line for each journal title, even where that journal title has undergone one or more title changes in its history. An example is:
"Information & Culture: A Journal of History"
The Project Muse listing indicates that the first issue of this journal in Project Muse is "Vol. 36 no. 1 (winter 2001)", but then goes on to note that this title was "Formerly Libraries & Culture through volume 41 no. 2 Spring 2006 (E-ISSN: 1534-7591 Print ISSN: 0894-8631)"
Further investigation shows that the journal has had another title during the period covered by Project Muse and so to load into GOKb three lines are required in the Refine project to represent this single line in the Project Muse file:
- Libraries & Culture: 2001-2006
- Libraries & the Cultural Record: 2006-2009
- Information & Culture: A Journal of History: 2009-present
(N.B. there are further title history details for pre-2001, but this period is not in the Project Muse coverage and so not detailed here).
There are two ways of adding additional rows to an existing Refine project detailed below.
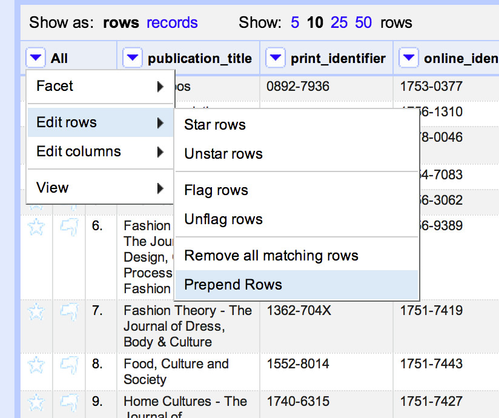
"Prepend Rows" function
There is a dedicated function to add new rows to an existing Refine project called 'Prepend Rows'. This function adds a specified number of rows to the start of the project. The option is accessed via the 'All' drop down menu over the first column in the project using 'All' -> 'Edit rows' -> 'Prepend Rows'.
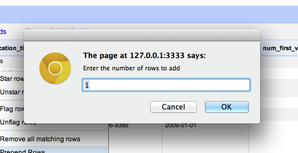
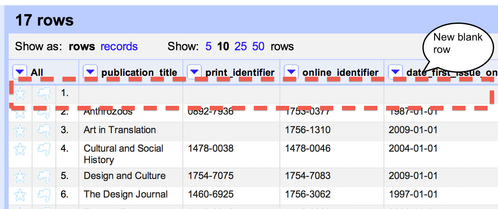
You will then be asked to specify the number of rows, and once you click 'OK' that number of rows will be added to the top of the project:
"Split multi-valued cells" method
Once a project had been created in Refine there is no direct 'add row' but there is a relatively straightforward way of adding new rows for title history or other purposes:
- Taking the existing line, edit a cell to include the relevant information for each row you want to add with a separator character (that doesn't already appear in the cell) between each value. So in the example above, one might edit the 'publicationTitle' cell from "Information & Culture: A Journal of History" to "Information & Culture: A Journal of History, Libraries & the Cultural Record, Libraries & Culture" - which uses a comma to separate the titles from each other
- Click on the column header dropdown and choose "Edit Cells" -> "Split multi-valued cells"
- Choose the appropriate separator character (in this example the default of a comma is used)
- Click OK
In place of the previous single row, there will now be three rows one for each title from the title history. The other details can then be added/edited as appropriate.
This method is demonstrated in a screencast at http://youtu.be/psDmTjQpyZ0 (embedded below)
Removing Rows
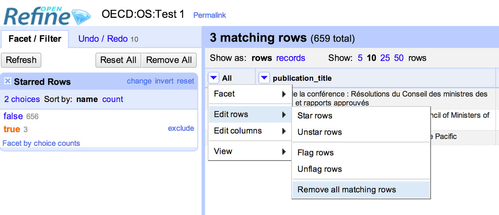
To remove rows in Refine you first need to select the rows you wish to remove. This is done by filtering the rows so that only the rows you wish to remove are included in the current view, then removing all these rows. If all the rows you wish to remove have some common property you can filter to the rows you wish to remove using facets or text filtering. If there is no common property between the rows, then rows can be individual marked with a 'star' then you can create a facet for starred rows and remove the selected records.
Once you have filtered to the rows you wish to remove, you remove them through the 'All' dropdown menu (at the head of the first column in the project) selecting 'Edit rows' -> 'Remove all matching rows'
A screencast will be added shortly to demonstrate removing rows
Operated as a Community Resource by the Open Library Foundation